Thursday, September 25, 2014

Recipes for all!

Oh my! I haven't written in so long. I would apologize, but let's face it, not many people are looking at this blog. Oh well, for those who want recipes that are tried and true, you've come to the right spot. I have had a blast this summer. It was so fun to pick so many Oregon berries. Strawberries, blueberries, raspberries and blackberries. I really over did it, when it came to the u-pick farms. And I had my three kids with me, but they were surprisingly happy, chipper little helpers. My oldest was a drill sergeant! DON'T STOP PICKING!!! I got a little frightened. haha. Then of course it was time to pick peaches, apples, pears, and I even got a sweet bundle of Italian prune plums.

This summer was filled with everything from blueberry muffins to peach and blackberry cobbler to triple berry cobbler to apple pie, plum crunch cobbler, and of course apple fritters. I have lost about 75-80 lbs, so to try and keep that off I had to share my treats, which was good for me to get feedback from friends and my family. So I have gathered my favorite recipes from this summer and I will also post some great recipes to kick off Fall.

First up,
Blueberry Muffins: I found a great recipe on Pinterest and it is so good!


*Feel free to use any berries you want in this recipe.
http://fabulesslyfrugal.com/blueberry-muffins/

Next up:
Peach and blackberry cobbler:

I just love The Pioneer Woman, Ree Drummond. She has so many wonderful recipes. I was visiting my mother-in-law a few years ago when she showed me this recipe. Ree's recipe is for blackberry cobbler only, but I love the peach added in and of course a triple berry cobbler is perfect too! So, here are the adjustments to make to her recipe. Add whatever berries or fruit you want. Ree says to pour the batter down first and then put the fruit on top. But because I use more fruit I will toss my fruit in a tablespoon of flour, and then I will pour 1/4 of the batter down, then the fruit, and then the rest of the batter and follow the rest of the directions from her recipe from there. 
Try putting them in individual ceramic dishes. Super cute for a party.

Now for Cake!
Lemon Cake with raspberry sauce:


Cake
2 cups all purpose flour
1 1/2 cups sugar
3/4 tsp baking powder
1 tsp baking soda
1/2 tsp salt
3 eggs
2/3 cup oil
2/3 cup lemon juice
3/4 cup sour cream

Lemon Curd
1/4 cup fresh lemon juice (about 1-2 lemons)
2 tsp finely grated lemon zest
1/3 cup sugar
4 egg yolks
3 tbsp butter (I used unsalted)

Lemon Buttercream
1 1/2 cups butter
1 1/2 cups shortening
12 cups (3 lbs) powdered sugar
3 tsp finely grated lemon zest
6 tbsp lemon juice
3/4 tsp vanilla
1-2 tsp water - plus more to the consistency you want


Instructions

Cake
1. Combine flour, sugar, baking powder, baking soda and salt in a large bowl and whisk together.
2.Add eggs, oil and lemon juice. Beat until smooth.
3. Add sour cream and beat until smooth.
4. Bake at 350 degrees in two 8-inch pans for about 25 minutes or until done.

Lemon Curd
1. Combine all ingredients in a double boiler (or in a metal bowl over a pot of simmering water, like I did).
2. Heat while stirring constantly with a whisk.
3. It is done when it's thick enough to coat the back of a spoon. You will be able to tell it has thickened, but I wouldn't say that it's "thick."
4. Refrigerate until cool and thick.

Lemon Buttercream
1. Beat butter and shortening together until smooth.
2. Add 6 cups of powdered sugar, one at a time, beating to combine.
3. Add lemon juice, lemon zest and vanilla and combine.
4. Add the remaining powdered sugar and beat to combine.
5. Add water to get the consistency you want, starting with 1/2 tsp, beat to combine.

To assemble the cake:
1. Divide the cake into four layers by slicing each cake in half.
2. Fill two layers with lemon buttercream and the other two with lemon curd.
3. Frost the outside of the cake.
4. Drizzle the raspberry sauce over each individual piece or add the sauce to each layer of the cake as you assemble it. You can't go wrong either way!

Raspberry Sauce:
Ingredients
12 oz frozen unsweetened raspberries, thawed
1/2 cup sugar
1 tsp lemon juice
2 heaping tablespoons cornstarch


Directions
1. Thaw raspberries.
2. With a fine wire strainer, use a spoon to press the raspberries so that the seedless pulp falls into a bowl below.  Strain enough pulp to get between 1/3 - 1/2 cup of pulp (I usually get close to the 3/4 cup). (You can skip this step and just use the whole berries, but people at weddings and parties don't like to pick seeds out of their teeth). Add enough water to equal 3/4 cups.
3. In a small saucepan, combine raspberry juice/water, sugar, lemon juice, and cornstarch.  Cook over medium heat, whisking constantly, until mixture bubbles and thickens (remember it will continue to thicken as it cools).  Remove from heat, set aside.
4. Cool and place in the refrigerator for up to a week.


Turkey Sausage and Kale soup

I love the Fall season. Everything is crisp and cool outdoors and leaves begin to change. I love the warm candles burning in my home, filling every nook and cranny with a wonderful cinnamon smell. But I of course love this season because I get to make all my favorite soups. Starting with this one, my turkey sausage and kale soup.

It is so tasty. Every time I make this soup I find myself tweaking and changing a little ingredient here and there, or adding something new to the pot. I made this soup just yesterday and here is what I came up with:


Turkey sausage and kale soup:

1lb. lean ground turkey sausage
1 1/2 tsp. salt
1/2 tsp. pepper
1 medium size onion, small diced
3 stalks celery, with leaves, small chop
3 large carrots chopped into 1/2 inch pieces
olive oil to coat the pan
1 bay leaf
1T. italian seasoning
2 cloves minced garlic
2 large boxes of favorite chicken stock. Broth is ok, but stock really has a greater flavor.
3-4 smallish red or yukon gold potatoes. not peeled. Diced in 1 inch pieces
1 bunch of Italian kale. regular kale is just great if you can't find italian. I find the Italian Kale holds up fabulously and doesn't get mushy. Washed and then remove the stem from the kale leaves. You can do this by cutting around each stem. But I find the quick and easy way to do it is grab the bottom of the stem between your first and second finger and hold onto the leaf and pull all the way down till it naturally comes off. Slice the kale into thin strips.
1 small box of dried cheese tortellini, frozen works well too.
2c. of whole milk, 1/2 &1/2, or 1c. cream
1c. heated through marinara sauce
1c. mozzerella/Parmesan cheese mix


Start by heating up a large pot over medium-med. high heat. Add a tablespoon or two of good olive oil to the pan and break the sausage into pieces into the pot. Cook the sausage till browned and cooked through. Then add in the onion, carrot, and celery. Let them saute for several minutes till translucent. Add in the salt and pepper along with the bay leaf, seasoning, and minced garlic. You add the garlic now and not before so you don't burn the garlic. Me no likey burned garlic. As my son says, "dats bleh mom!"

As the ingredients develop their full flavor, get your chicken stock ready. Then add the stock to the pot, turn the heat down to low, cover and let simmer for 2 hours. Then add your potatoes and let simmer on low for another hour, till tender.

Now you are ready for that healthy and delicious kale! Haha. Kale, it's good stuff, amiright? Even my kids ate it. I didn't even have to force them! And then grab your tortellini. You will cook these two last ingredients together in the pot because they take about the same amount of time. If it's dried tortellini it will be about 11-14 min. Once this is done add in your milk or cream to the soup. Stir and you are ready to serve it up!

Heat through some marinara sauce on the stove in a separate small sauce pot. Add a little bit of that extra italian seasoning to it too! Remove from the heat and pour into a small bowl. Serve each bowl of soup with a spoonful of the sauce and a sprinkle of the cheese.

There you have it! Delicious and somewhat healthy fall soup. The little addition of milk or cream gives the illusion that it's a rich soup, but the majority of it is broth! You can add or subtract any of the veggies you want/don't want. I love throwing in some zucchini or broccoli. But don't add them till you do the kale/tortellini otherwise it will be mushy. Mushy me no likey!

I hope you all enjoy this wonderful Fall season. I know I will!


Sunday, April 21, 2013

Crockpot or Slow cooking meals:
Recently my cute pregnant sister in law asked me for some crockpot dinner recipes. We all are so busy whether it be with kids, going to work, cleaning the house, or doing all three! So of course everyone thinks of the crockpot. Oh crockpot, you are our good friend. Less mess, less work, and super tasty. What more could you ask for? More recipes! I love being able to take classic recipes that might be baked or grilled or in a casserole and putting it into a crockpot. So, for example, the Boyd family favorite of chicken and broccoli is done in a couple different stages and baked in a casserole dish. So with the crockpot recipe you can enjoy all the same flavors, but skip a number of steps and get dinner out of the way early so you can enjoy the rest of your day...you know, cleaning the house and chasing toddlers. :)

Hopefully you will try and enjoy some of these recipes I post. Let me know if you are wanting to convert any type meal into crockpot style. Haha.


Chicken and Broccoli: serves 4-6
4-6 boneless skinless chicken breasts
2 cans healthy cream of chicken
1 block low cal cream cheese, room temp.
1/2c. grated Parmesan cheese
1c. low fat milk
1 14oz can chicken stock
1c. low fat sour cream
1/4c. finely diced onion
1/4c. finely diced carrot
4-5 cups fresh cut in pieces, broccoli
1 1/2 tsp. salt
1 tsp. pepper
1/2 tsp. garlic powder


Turn the crockpot on high, and place the cream cheese in side along with the soup, milk, stock, sour cream, and cheese. Combine and whisk together. Then add in the carrot and onion and the seasoning. Salt, pepper, and garlic. Place the chicken breast in and push down a little so the sauce slightly covers them. An hour to an hour and a half before done, toss in the broccoli. This way it wont be mushy. Bleh. If you are in a hurry, then leave the crockpot on high for about 4 hours. If you are putting it in and have plenty of time, then turn to low for 6 hours. You can eaither serve the chicken in whole or half peices. Or pull the chicken out and shred it. It takes an extra step, but I love it when it's shredded. Pour the mixture over some rice and yum! If you have left overs, I like to turn the rest into a soup the next day. Add in some stock and veggies of your choice and now you have 2 meals for one. Serve with a homemade biscuit and jam.


Friday, July 27, 2012

What to do on a Friday? Bake banana bread!

I adapted this recipe from the Southern Living cookbook. I just love all the classic recipes you can find from there. I came across this banana bread recipe and couldn't just make it how it said to. I had to put the "Emily spin" on it. So I came up with this version, and it happens to be my favorite so far.


Banana Walnut Bread: or muffins

Bake time for loaf: 50min-1hr.
bake time for muffins: start with 18min.-20min. time will depend on your oven, may need more or less time

2 cups self rising flour. If you don't have self rising, you can make your own.
          1c self rising= 1c. all purpose + 1 tsp. baking powder + 1/2 tsp. salt. Yahoo!
1c. white sugar
1/2 tsp. baking soda
1/4-1/2 tsp. cinnamon, depending how much you like
1c. chopped toasted walnuts
1/2c. butter melted, don't even think about using margarine. :)
3 very ripe bananas mashed. Now you have another use for that potato masher!
2 lg. eggs, lightly beaten
1/4c. low fat buttermilk
1tsp. vanilla extract

Now, this is the time to decide if you want muffins or a loaf. Or double the recipe and have both! I chose to do both this time because I was sending some to a friend or two and for my family there are people who like nuts, don't like nuts, and then there's my hubby who doesn't touch the stuff unless there be some chocolately chippies (that is, chocolate chips) in there. So when the mix is complete and before you add nuts, you can choose what you want to do.

Combine first 5 ingredients in a large bowl, unless you don't want nuts; make a well in the center of the mixture. After that, in a separate bowl, mix melted butter, banana, eggs, buttermilk, and vanilla. Once combined then pour the mixture in the dry. Stir with a wooden spoon till all the dry is incorporated.

At this point you can pour the batter into a 9 x 5 loaf pan, or you can line muffin tins with liners and make muffins. It will probably make 24 decent sized muffins. I like using an ice cream scoop to make sure each muffin is about the same so they cook evenly. Muffins will take less time and are fun for kids to eat. 

Wednesday, July 11, 2012

Summer Time Meal

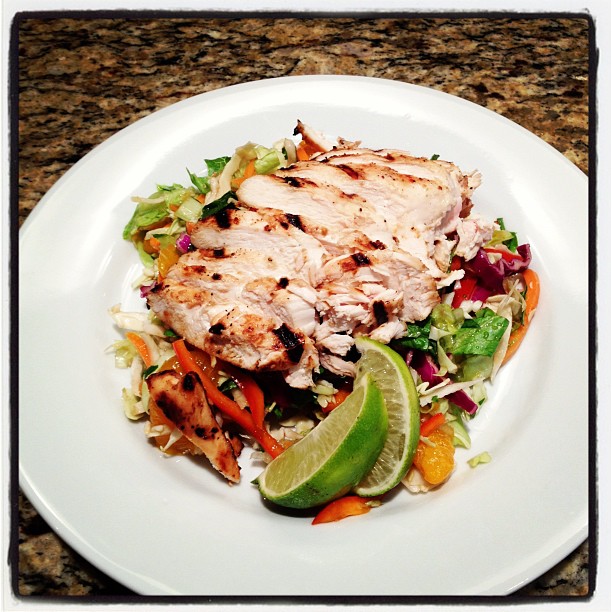
The other day I made a very yummy, and summer friendly salad for dinner. I thought I would post the recipe for those who wanted a low cal, easy, summer meal.
Asian Chicken Salad: serves 4

(chicken marinade)
2-3 lg. chicken breasts
1/4c. Ken's light olive oil vinegerete
1/4c. Newman's low fat ginger and sesame dressing
1 T. honey dijion mustard
1/2tsp. salt
1/4tsp. fresh cracked pepper

(Salad ingredients)
1 lg. head of washed, and chopped romaine lettuce
1 bag of coleslaw mix, no dressing (green and red cabbage, and carrot)
1 red bell pepper, julienned
 1 large can mandarin oranges, drained
2 green scallions, thinly sliced
2 T. fresh chopped cilantro
 (dressing)
Simply add desired amount of Newman's low fat sesame ginger dressing. *Only add a little at a time, so you don't wilt the lettuce too much.

 Mix chicken with the marinade ingredients, and put in a plastic zip bag, and then place that bag in a bowl. Let the chicken marinade for several hours in the fridge. When you are ready to make the salad, pull the chicken out of fridge and let stand for 10 minutes as the grill warms up to med-hi heat. Cook chicken till it's cooked through (165 degrees). Discard any of the remaining marinade. As the chicken grills, mix all salad ingredients together in a large bowl. Mix in a little of the dressing and toss. I would start with 2 or 3 tablespoons, then go from there. Once chicken is done. Let it rest for 5-10 min so the juices stay with the chicken. Then slice the chicken. Put several cups of the salad on each plate and then fan out several pieces of chicken onto each plate. The grill gives the chicken such great flavor, without adding a ton of oil or fat. I garnished the plate with a couple wedges of fresh lime. Have each person squeeze fresh lime over their own plate just before eating. It brighten's up all the flavors. Enjoy! We sure did.

Friday, June 1, 2012

Crepes for Breakfast

I love making pancakes for my family on the weekend. But I also love changing it up a bit. Pancakes, waffles, and of course CREPES! Crepes are a wonderful vessel for fresh fruit and cream or delicious nutella and bananas. So here is a recipe for how the Boyd family rocks their crepes.
Strawberry and Cream Crepes: 4 eggs 2c. flour 2c. cold milk 1/4c. butter, melted 1/2 tsp. salt 2 tsp. sugar Mix all ingredients in a blender or my new favorite...use a hand blender. It's less mess to clean up. Get a round non-stick sauce pan and heat over med. to med.-low heat. Use a little butter to coat the pan so the crepe doesn't stick. Pour a 1/4-1/2 cup of batter in the pan and gently swirl the batter around so it covers the pan evenly. Using a spatula, run it around the edges of the crepe after a minute on the pan to loosen it up. Then give it another 30 sec. to a minute until just slightly golden, and flip with the spatula for another 30 sec. Once you have a couple crepes made, it's time to assemble! This is the best part. You can pretty much add anything you wanted to the crepe. For me, I love sliced fresh strawberries with a pinch of sugar and some fresh homemade whipped cream (see below for whip cream recipe). Top the crepe with a couple more strawberries, roll it up and enjoy! Homemade Whip Cream: 1c. heavy whipping cream 2T. sugar 1/2 tsp. vanilla extract Whip all ingredients in a mixing bowl till light and fluffy. Use this to top just about any yummy dessert or breakfast item. Or if you're like me and my awesome sister Lauren, get two spoons and share with a buddy! Haha.

Monday, May 7, 2012

Family BBQ

It was such a beautiful day here in Portland. The sky was blue and the temp was only 80 degrees. That put me into BBQ mode. So here are the recipes I came up with for our family BBQ. Guacamole Burger: 4 servings 1-1 1/4 lb. lean ground beef salt and pepper to taste 4 T. BBQ sauce 4 slices colby jack cheese Evenly divide the beef into 4 patties. Sprinkle with salt and pepper. Place on the grill and once you flip the burger, add a tablespoon of BBQ sauce to each burger and then the cheese on top . Finish cooking a couple more minutes till desired doneness. Pull off the grill and assemble the guacamole burger! Guacamole: 3-4 avocados 1/4 diced red onion 1 tomato, seeded and diced Juice of a lime salt and pepper 8 dashes of hot sauce 1-2 T. chopped cilantro We had this with fresh fruit, and chips and salsa. I made fresh pico de gallo that was so delish! Here's the recipe for the pico. Pico de gallo: 3 tomatos(on the vine), diced 1/4 red diced onion 2 T. chopped cilantro salt and pepper to taste juice of a lime 1/4 tsp. lime zest Mix all together and let sit for 15 minutes. Serve with tortilla chips and enjoy!

Friday, May 4, 2012

Plum Tart

It's been a while since I have last posted a recipe. With a new baby, husband graduating with his MBA and a move with a 11 hour drive, I have been a wee bit busy. But after having a wonderful conversation, part of which included recipes, with my Aunt Laurie I had to post this plum tart recipe. It was fun to chat with her about how my grandma Rosie (her mother) loved Ina Garten's recipes. I think had they ever met they would be good friends. Haha. She was known for her special touches she put into things. Much like what I think Ina Garten tries to do as well. Simple ingredients, great quality, and little touches to make a dish oh so special. After learning that Rosie was into tarts and crisps for a while, I had to post this plum tart recipe. Might I suggest this recipe be made on a summer day? We have moved to Portland, OR and with summer approaching how can you not go to the farmer's market, pick out the freshest plums and create this fun treat?!? Ina Garten's Plum Tart: Ingredients 2 cups all-purpose flour 3/4 cup finely chopped walnuts 3/4 cup light brown sugar, lightly packed 12 tablespoons cold unsalted butter (1 1/2 sticks), diced 1 egg yolk 2 pounds firm, ripe Italian prune plums, pitted and quartered lengthwise Directions Preheat the oven to 400 degrees F. Combine the flour, walnuts, and sugar in a large bowl. Add the butter and the egg yolk. Mix, either by hand or with an electric mixer, until crumbly. Press 1 1/2 cups of the crumb mixture in an even layer into the bottom of a 9 1/2-inch springform or tart pan. Arrange the plums in the pan, skin side down, to form a flower pattern; begin at the outside and work your way in. Sprinkle the rest of the crumb mixture evenly over the plums. Bake the tart for 40 to 50 minutes, or until it's lightly browned and the plum juices are bubbling. Remove from the oven and cool for 10 minutes. Remove from the pan and transfer the tart to a flat plate. Serve warm or at room temperature.

Monday, January 24, 2011

Cucumber Salad

Ok, this might not be everyone's favorite dish but I just love it! My Grandma Rosie made this delicious cucumber salad which her family just loved. Her kids, and grandkids still crave it every now and then. I think some people have the exact "Rosie" recipe but I didn't get the recipe just the way she made it. So here is what I came up with. When I was in AZ for a visit, Marta and I made it for my dad Tim. He loves this and she wanted to make sure she had a good recipe to make for him. This is what I could come up with. Give it a try, I hope you like it like us Kindt's do.

Cucumber Salad:
4 english cucumbers, split length wise and seeded
1/2c. hellman's light mayo
1/2c. light sour cream
1/4c. fresh squeezed lemon juice
1T. salt
1tsp. pepper
1/4c. fresh chopped dill (this is key! If you only have dried that's ok, but fresh is ideal)

*I used light sour cream and mayo to try and be a little figure friendly. But if you want to go all out, be my guest!

*Peel the cucumbers, then split them length wise and scoop out the seeds. Slice them as thinly as you can. Toss in a bowl. In a small bowl mix the the mayo, sour cream, lemon juice, salt and pepper, and dill. Combine well and taste. Add more salt or pepper or whatever you think it may need. Toss the sauce with the cucumbers. Cover and refrigerate for at least a couple hours or till chilled. This is great serving on a nice summer day when you are having a BBQ but if you're a Kindt you probably love this any time! Give it a try.
*Side note: As you let it chill, the cucumbers release water, but that's normal. With the seeds gone it wont be too watery. The sauce in the end is supposed to be a little thin.

BBQ Beef Short Ribs

If you are craving some BBQ I have a great recipe for you! Beef short ribs are easy to make, tasty, and family friendly. I love this recipe and have made it several times for my family. Hopefully you will try it too and enjoy.


Beef Short Ribs:
2 lbs of boneless beef short ribs
1 jar of your favorite BBQ sauce...I highly recommend Brothers BBQ, which can only be found in Denver, CO but totally worth it. You can order it online. Or if you prefer the easy way, you can go to the grocery store and try the brands Sweet Baby Rays, or Famous Dave's.
1 8oz. can tomato sauce
8oz. water
1 yellow onion diced
1 carrot diced
2 cloves garlic minced
1 tsp. chili powder
1 1/2tsp. salt
1 tsp. pepper
1T. good extra virgin olive oil

*Start by taking the meat out of the fridge 15 minutes before cooking. Then pat the meat with a paper towel, this will allow the meat to sear really well. In a dutch oven pour oil in and heat over med-high. Season the meat with the salt, pepper and chili powder. Sear the meat on both sides till nicely browned. Then take out and put on a plate. Toss in the onions and carrot and saute for 2 minutes, then add the garlic. Continue sauteing for 2 minutes more. Scrape the pan with a wooden spoon to bring up the bits from the bottom.
*Add the meat and juices to the pan and then pour the BBQ sauce, tomato sauce and water on top. Swirl around to incorporate. Turn the heat down to low, so it's just barely a simmer. Cover and let cook for 3-4 hours, or until fork tender.
*I love serving this dish with red mashed potatoes, or with fluffy white rice. Also if you can get your kids to choke down some veggies, I love to serve fresh steamed green beans or green peas. Hope you enjoy this as much as our family does!

Sunday, January 23, 2011

Cookbooks

So I was thinking, in case anyone actually tries my recipes and doesn't really care for them, I thought I would list some cookbooks that I have found of great use.

I love any and all of the Barefoot Contessa (Ina Garten) cookbooks. She uses simple recipes but uses great quality ingredients and it's usually pretty easy to make any recipe of hers. Also, she has a new cookbook that just came out called Barefoot Contessa: How Easy Is that? I am going out tomorrow morning to buy it and hopefully soon will try her recipes and post about it. As you can probably tell, she is my favorite chef. I also love using the Better Homes and Garden cookbook. They have basic recipes for classic dishes, and usually a good variety to choose from.

The other thing that can be useful is a collective cookbook. Whether it's a collection of recipes from friends, family, co-workers, church friends, it is usually a great go to source.

So let me know if this helps. Happy Cooking!

Thursday, January 20, 2011

Beef Bourguignon

I made this classic french dish in a french cooking class and I have also made it for a cooking night with friends, and for family. It has always been a hit. It's so tasty and comforting with out feeling so heavy. I hope you try this out on your family. It is really just beef stew that has a little more flavor than the one you probably grew up with. I loved the version I tried in the cooking class and the version that Ina Garten has. She is just pure genius when it comes to cooking. Anyway, I think I have added my own twists to this yummy dish and I hope you'll enjoy.

Beef Stew (jazzed up):
1 tablespoon good olive oil
4slices applewood smoked bacon, diced
2 1/2 pounds chuck beef cut into 1-inch cubes, or you could use filet mignon. It tastes wonderful!
Kosher salt
Freshly ground black pepper
1 pound carrots, sliced diagonally into 1-inch chunks
1 yellow onion, sliced
2 teaspoons chopped garlic (2 cloves)
2c. good dry red wine such as Pinot Noir
4c. good beef stock (preferably unsalted)
1 tablespoon tomato paste
1 teaspoon fresh thyme leaves (1/2 teaspoon dried)
2 bay leaves
4 tablespoons unsalted butter at room temperature, divided
3 tablespoons all-purpose flour
1 pound frozen pearl onions
2T. heavy cream

*Heat the oil in a large dutch oven. Then add the diced bacon. Cook and then remove. Remove the fat except 2 tablespoons. Then before adding the beef, you want to pat the beef dry with a paper towel. This will allow for good searing. Also, make sure the beef is in single layers. You may need to sear the meat in several batches, but it's totally worth it. Then remove the meat on put on a plate. Add in the onion, carrot, and garlic and saute over medium-low heat till caramelized, or for 3-5 minutes. Throw in a tablespoon of salt and 2 teaspoons of pepper. Then add in the bay leaves.
*Add the red wine to the pot and deglaze the pan stirring up the bits from the bottom for about 1-3 minutes over medium-high heat. Add the beef, thyme, and tomato paste back to the pan, then pour in the beef stock till it covers the meat.
*Bring pot to simmer and cover with a tight fitting lid. Simmer for about 1 1/2 hours or till meat is tender. Then combine the butter and flour into a paste and wisk that into the pot. Bring to a slight boil until stew is thickened. Add in the pearl onions and heat for 5 minutes or so. Stir in the cream at the last minute and then serve in a bread bowl or with french bread.
*I hope you enjoy this dish!

Tuesday, January 4, 2011

Chicken Pot Pie, slimmed down

This one's for you Carrie!
I love using the foodnetwork.com website for great recipes. But sometimes I can't find exactly what I am looking for but it will give me enough to inspire me to come up with a recipe of my own. So for a lower calorie version of chicken pot pie, it gave a couple ideas, but here is what I came up with. I have made this before, but due to the request for the recipe I recently changed the recipe a bit.

Slimmed Chicken Pot Pie: serves 4-6
3-4 boneless skinless chicken breasts
4c. low sodium chicken stock (stock NOT broth, stock has much more flavor)
2T. extra virgin olive oil
1/2c. diced celery
1/2c. sliced carrots
1/2c. diced onion
1tsp. minced garlic
1 idaho potato cubed
1/2c. frozen peas
1/2c. frozen green beans
1T. fresh parsley
2tsp. fresh thyme
1 bay leaf (fresh or dried)
1/4c. flour
1/4c. milk (whole, 1%, 2%, doesn't matter)
1T. salt
2tsp. fresh cracked pepper
1 refrigerated pastry pie crust (pillsbury has a good brand)
1egg beaten with a splash of milk
salt and pepper

Bring the stock up to boil in a medium sauce pan and then add the chicken. Simmer for about 15 minutes until the chicken is just cooked through. Then reserve the stock and dice up the chicken. Put chicken aside and stock in a separate bowl. In the medium sauce pan now add the olive oil and add celery, carrot, onion, potato and bay leaf. Saute on medium heat for about 8 minutes or till just tender. Now add in the garlic and saute for 1 minute, then add the frozen peas and green beans. Then add the flour and cook for 1 minute more. Toss in the herbs and also remove the bay leaf. Add the rest of the stock and milk in and mix together. Stir in the salt and pepper. Pour the mixture into a deep pan (oval, round, square, or rectangle...doesn't matter). Then top with the refrigerated pie crust. Stretch to fit the pan you're using. Then brush the egg wash over the top and sprinkle with salt and pepper. This will give the pie a beautiful sheen. Bake according to the box that the pie crust came from (try 450 for 11-13 min.). Enjoy with some simple fresh organic salad greens tossed in a light vinaigrette or just as is.

By using a stock base rather than cream or milk, it cuts many calories. Also using only a crust for the top and not for top and bottom, that too saves calories. Also adding in a touch of milk will trick your mind into thinking it's creamy without the guilt. I have made this before but change up the veggies. If your kids are picky eaters use what they will like. Some kids only will go for carrots and peas, but I think this recipe is a good way to trick them into eating more veggies. Although, kids are super sneaky and they usually will find whatever healthy thing you've put in. Luckily for me both of my kids love green beans, peas and the rest they will usually go along with.
Happy cooking to you all!

Sunday, January 2, 2011

Healthy Lunches for the Family

Part of changing my eating habits is changing my families eating habits. So for my husband Dave I like to have several good options for him to choose from before he goes to school. It can range from trail mix and a granola bar with an apple to Dave's favorite go to choice, a turkey sandwich.
Peppered Turkey sandwich:
(from the deli counter) Jennie-O peppered turkey breast thinly sliced
1Tbsp. whipped fat free cream cheese, or cheese of your preference (1 slice)
red leaf lettuce
2 slices of all natural whole grain bread
Now, this is usually where it stops for Dave, but if you add more veggies it doesn't add hardly any calories, but fills you up more and gives great vitamins.

So, in the past here is what I have tried:
thinly sliced green bell peppers
pickles (sweet or dill)
cucumbers sliced
roasted red bell peppers
sliced red onion
tomato (roma, or on the vine)
So gather your ingredients and build your creation. Now either sit down, and enjoy it right then, or take it one step further and place on a grill pan to toast the bread and melt the cheese. Delicious! It's easy, pretty inexpensive, family friendly, and very tasty. It sure beats a lean cuisine meal.

Thursday, December 30, 2010

Post Holiday Healthy Food

Cooking is so fun for me, but it becomes kind of tricky when I am trying to lose weight. So I am going to try and come up with some new post holiday healthy foods to make. I have lost 15lbs. in 6-7 weeks, but as you can imagine with Christmas, this past week has been tricky. So with New Year's rolling around the corner I will continue making healthy changes, and get back to cooking healthy dishes. Don't get me wrong, I love the yummy treats the holiday's seem to bring, but you get to a point where you need fresh bright healthy flavors. I hope those who may actually read this blog will enjoy the recipes I come up with. If there is something you are craving but are looking for a healthy way to enjoy it, let me know and I will try to come up with a recipe for you.

One dish I love to make is lemon grilled chicken with a balsamic drizzle. So tangy and tasty. It is also so simple. Just combine all the ingredients in a plastic bag, and let marinade all day. Then throw it on the grill, or in a pan on the stove, and in minutes you have a delicious dish to wake up your taste buds.

Lemon Chicken: Serves 4
4 boneless, skinless chicken breasts
3 cloves, minced garlic
1/2c. lemon juice
1 tsp. lemon zest
1/4c. extra virgin olive oil
2 tsp. fresh chopped thyme
1 tsp. salt
1/2 tsp. fresh cracked pepper
* mix ingredients together, add chicken and coat. Let marinade all day and then grill or bake or saute. Enjoy!

Balsamic drizzle:
1/2c. good balsamic vinegar
1 tsp. sugar
* heat in sauce pan over med-low heat till slightly thickened.

After marinading the chicken then throw on the grill till cooked through. Drizzle the balsamic vinegar over the top. It doesn't take much of the balsamic vinegar, only a little bit and you get that tangy flavor. I would suggest serving fresh snap peas, or green beans steamed along side the chicken. When the farmers markets open up again, it provides a wonderful selection of fresh produce that is excellent to cook with.

Thursday, November 18, 2010

Quick cooking

I was waiting for Dave to come home from an Info Session for school. SO I hadn't made anything yet. I fed the kids ahead of time and then tried to figure out what I had on hand to make for Dave and I. So, I went to the pantry and decided to see what was there. A box of penne pasta, a jar of good quality marinara sauce and herbs de provence. So here is the recipe for a delicious cheesy pasta.

Penne with Marinara:

3/4 box of penne pasta
1 pound of lean ground beef
1 T. herbs de provence (or Italian seasoning)
1 tsp. salt
1/2tsp. pepper
1 jar of favorite marinara sauce
1/4c. asiago cheese, shredded
1/4c. Parmesan cheese, shredded

Bring pot of water to a full boil. While that happens brown ground beef in a saute pan with 1T. olive oil, salt, pepper, and herbs de provence. While meets browns add the pasta to water. Add marinara sauce to the meet. When pasta is done(10-12 min) drain and return to pot. Add the meat sauce and mix well. Then add in the cheese and stir a little longer. Serve in bowls with your favorite french bread. Enjoy!

Wednesday, November 17, 2010

Delicious Pumpkin Cake

I haven't added anything to the blog in a while, but here is a fabulous recipe that is easy and fast to make.
Pumpkin Cake:

1 box Spice cake mix
3 large eggs
1 small can of pumpkin
1 cup of water
1 tsp. vanilla
1 tsp. cinnamon
1/2c. chopped pecans
1/4c. chopped walnuts
1/4-1/3c. white sugar
3T. cinnamon

*Mix the spice mix, eggs, pumpkin, water, vanilla, and cinnamon. Mix on medium speed for a couple minutes. Then pour half of the batter into a lightly greased non stick bundt pan. Then in a small bowl mix the nuts, sugar and cinnamon. Pour 3/4 of the mixture on the batter, then spread the rest of the batter in and sprinkle the rest of the sugar/nut mixture on top. Bake in a preheated oven at 350 for 35-45 minutes, or until done. Serve in the morning for breakfast on Thanksgiving day. You will love it!

Sunday, March 7, 2010

KEEP YOUR EYES PEELED FOR AN ECLAIR RECIPE! COMING SOON!

Sunday, February 28, 2010

Chocolate Goodness!

My sister came to visit this past week and she can't have flour in anything she eats. So one day a couple years ago I was trying to find a cake recipe that would work for her. I came across this cake and I knew it would be a hit!
It tastes so delicious! I hope those out there reading this will give the recipe a try.

Flourless Chocolate Cake:
2 sticks of butter
8 oz. semi-sweet chocolate chips
7 egg yolks
1/2c. sugar
5 egg whites
1 tsp. vanilla extract

Over a double boiler, melt the butter and chocolate chips. While this is melting, beat the egg yolks and sugar. The egg yolk mixture should be light in color, and fluffy. Combine the chocolate mixture with the egg yolk mixture. In a separate bowl beat the egg whites. Once light and fluffy, gently fold whites into chocolate mixture. Add the vanilla extract, and pour into a greased 9 inch pan. Heat oven to 350 and bake for 25-35 min.

We then like to top the cake with a chocolate frosting. This frosting goes on thin and hardens slightly once it has had a chance to cool down.

Chocolate Frosting:
1 stick of butter
2T. dark cocoa powder
3T. buttermilk
1tsp. vanilla extract
2c. powdered sugar

Melt butter and then add in cocoa powder, and buttermilk. Mix well together over medium heat. The add 1c. of the sugar and heat for 1-2 minutes. Then add the rest of sugar and vanilla. Heat for another minute and then pour over cake.
Enjoy with fresh berries and vanilla ice cream.


Monday, February 22, 2010

Birthday Cake Busted!

This is my story about an adorable cute little cupcake birthday cake gone all wrong. Too bad I forgot the camera.
I was making a ginormous cupcake cake that was going to sit on top of a two level 9 inch round cake. The cupcake turned out great and the other round cakes turned out as well. I put dowels in the round cakes and put the cupcake cake on a cardboard round cut out. The hitch was once I put the cupcake on top of the other cake it started to look like it was a little top heavy. Yipes! I still had to hold this thing on my lap for a 20 minute car drive.
So here's how this whole thing went down.
I get in the car, and we get out of the driveway...totally fine.
We get out of the neighborhood, still good.
We get onto the main roads and I notice the bottom cake is starting to crack a little. So I say to Dave, it wont hurt if you go a little faster. Haha.
We get 3/4 the way there and we were turning and I noticed that the cake started to crumble. At that point I am holding the cake with my hands and I am not too happy about this. I say to Dave, oh great. Just great! He says, I think the cupcake cake is too top heavy. I say, really? Are you sure? I was a little smarty pants. I was so frustrated, but we finally get to my in-laws home and I just start balling. I was so sad and so sorry. Everyone was so kind but I still felt bad. Oh well. That is my story. I made a cake. It was the cutest little cake, only problem was it didn't make it to the destination in one piece. But other than that, it went great.
Oh well. Live and Learn. Next time I will be better prepared. Can't wait for the next challenge. And hopefully I will have pictures!